Introduction
Whether you dream of directing the next blockbuster or simply want to turn your vacation clips into a polished highlight reel, iMovie for iPhone and iPad gives you the power to craft compelling stories right from your pocket. Unlike quick social-media edits, iMovie puts you in full creative control—from trimming clips to adding soundtracks. This guide walks you through every essential step, so you can transform raw footage into a video you’ll be proud to share.
Getting Started with iMovie on iPhone and iPad
Launch iMovie from your home screen. If you don’t have it installed, download it free from the App Store. The app opens to the Projects browser, where you’ll tap the + button to start something new.
Importing Media
When you create a new project, iMovie presents three options: Movie (traditional timeline editing), Trailer (cinematic templates), or Magic Movie (quick, AI-assisted assembly). For full control, choose Movie. You’ll then be prompted to select videos and photos from your Camera Roll. Tap on clips to highlight them, then tap Create Movie at the bottom.
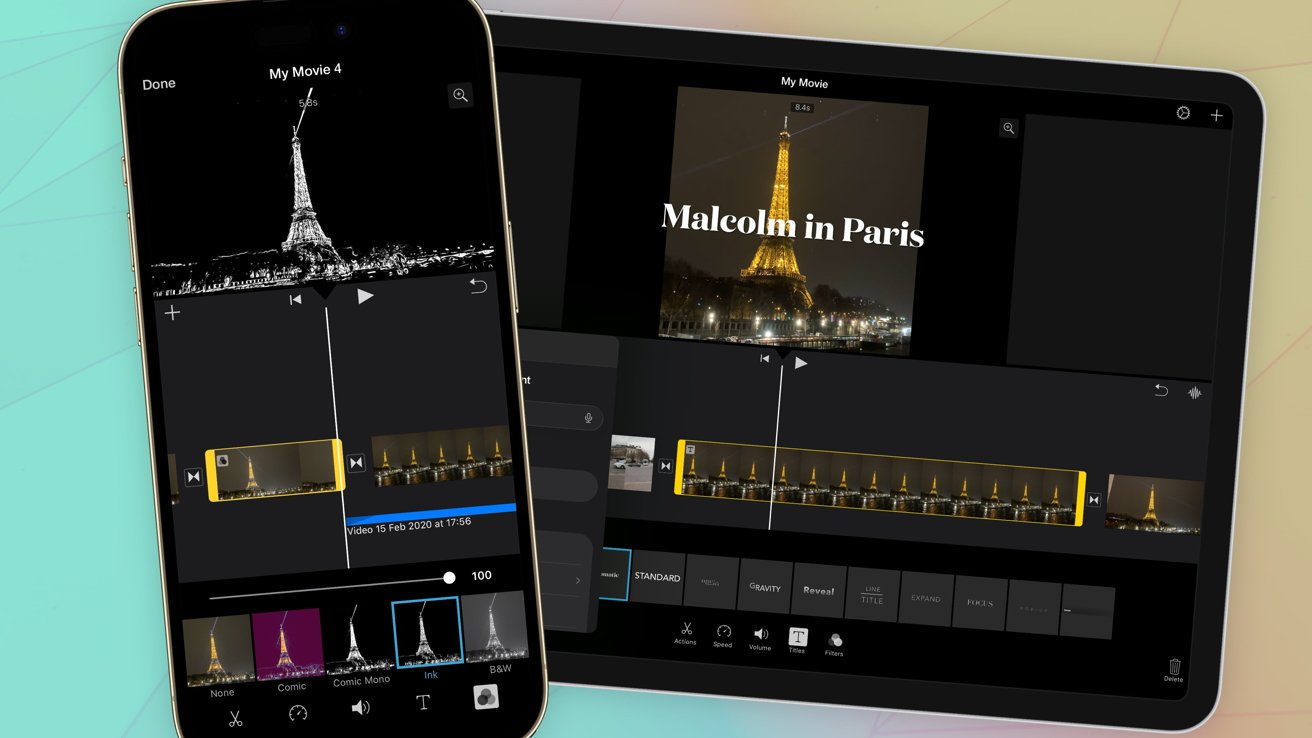
Understanding the Timeline
Your selected media appears in a horizontal timeline at the bottom. Each clip is a colored block. You can pinch to zoom in for fine edits or zoom out for an overview. Above the timeline, the viewer shows your work-in-progress. Tap any clip to select it—a yellow border appears, and handles for trimming become visible.
Basic Editing Tools
Now that your clips are in place, let’s shape them.
- Trim: Touch and drag the yellow handles at either end of a clip to shorten or extend it. The viewer shows the trim point as you drag.
- Split: Place the playhead (the white vertical line) where you want to cut. Tap the clip, then choose Split from the pop-up menu. This breaks one clip into two, allowing separate adjustments.
- Reorder: Press and hold a clip, then drag it left or right along the timeline.
- Delete: Tap a clip, then tap the trash icon (or swipe down on the clip) to remove it.
Each of these actions is non-destructive, meaning you can undo or re-edit later without losing original media.
Adding Transitions and Effects
iMovie includes several cinematic transitions to smooth the jump between clips.
Applying a Transition
Tap the small gray rectangle that appears between two clips on the timeline. A menu opens showing options like Cross Dissolve, Fade to Black, and Slide. Choose one, or adjust the duration by tapping the Settings icon (gear). For a uniform look, you can apply the same transition to all gaps at once.
Video Filters
To change the color tone of a clip, tap it, then tap the Filmstrip icon in the toolbar below. Swipe through filters like Romantic, Bright, or Noir. Tap one to apply it. You can also adjust the intensity by tapping the filter again.
Audio and Music
Great video deserves great sound. iMovie lets you use the original audio, add background music, or record a voiceover.
Adjusting Volume
Select a clip, then tap the Volume icon (speaker). Drag the slider up or down. To fade in or out, enable Fade In/Fade Out toggles in the same popover.

Adding Background Music
Tap the + button above the timeline, then choose Audio. You can pick from iMovie’s built-in soundtracks, songs from your Apple Music library, or audio files from Files. The music appears as a separate green track below your video clips. Adjust its volume independently so it doesn’t overpower dialogue.
Recording a Voiceover
Place the playhead where you want narration to begin. Tap the + button, choose Voiceover, then press the red record button. Speak into your iPhone or iPad’s microphone. When finished, tap stop. The recording appears as a purple clip on the timeline. You can trim or move it like any other clip.
Advanced Tips for Polished Videos
- Speed Changes: To create slow-motion or fast-motion, tap a clip, then tap the Speedometer icon. Drag the slider left (slower) or right (faster). iMovie smoothly adjusts playback.
- Ken Burns Effect: Select a still photo, tap the Ken Burns icon (mountains). Drag to set start and end points. The camera will slowly pan across your image—perfect for adding motion to static shots.
- Picture-in-Picture and Split Screen: Tap the + button, choose Clip above, then select a second video. Tap the three dots on its thumbnail and choose Split Screen or Picture in Picture. Resize and reposition as needed.
Exporting Your Masterpiece
When you’re satisfied, tap Done in the upper-left corner. Back in the Projects browser, tap the project thumbnail, then the Share icon (box with arrow). Choose your export resolution: 360p (low-res for quick sharing), 540p (standard), 720p (HD), or 1080p (Full HD). You can also share directly to YouTube, Facebook, or other services. Tap Save Video to store the final file in your Photos app.
Conclusion
iMovie on iPhone and iPad is deceptively powerful. With the tools outlined above—trimming, transitions, music, effects, and export—you can produce videos that capture attention and tell a story. Return to Getting Started to review basics, or jump to Advanced Tips for extra flair. The only limit is your creativity. Start editing today and see your holiday clips transform into something truly watchable.