Introduction
Starting with Ubuntu 26.04 LTS, Canonical made a significant change to how you enable Ubuntu Pro. The old Software & Updates utility is no longer included in default installations. Instead, Ubuntu Pro settings have moved into the Security Center app. This shift not only streamlines the setup process but also offers a cleaner, more spacious interface with clearer descriptions of each option. Best of all, the core experience is even smoother than before. Whether you're a home user looking to secure up to five devices for free or a business managing a fleet of Ubuntu machines, this guide will walk you through every step.

What You Need
- A system running Ubuntu 26.04 LTS or later (with Security Center preinstalled)
- An active internet connection
- Optional: An Ubuntu One account (for personal use) or a paid subscription token (for enterprise use)
- Basic familiarity with the Ubuntu desktop environment
Step-by-Step Instructions
Step 1: Open Security Center
Click on the Activities button at the top-left corner of your desktop, then search for “Security Center.” Alternatively, you can find it by navigating to Settings → Privacy & Security → Security Center. The app launches with a clean dashboard showing your system's overall security status.
Step 2: Locate the Ubuntu Pro Section
Inside Security Center, look for the Ubuntu Pro tile or tab. It is usually prominently displayed near the top of the window. If you don't see it immediately, scroll down or check the sidebar menu for “Pro” or “Ubuntu Pro.” Click on it to open the dedicated Pro settings panel.
Step 3: Review the Available Options
The Ubuntu Pro panel now presents all configuration toggles and settings in a spacious, easy-to-read layout. You will find:
- Enable Ubuntu Pro – the master toggle to activate the service
- Subscription status – displays whether you are using the free personal plan, a paid subscription, or no subscription
- Services list – a breakdown of available security patches, livepatch, and compliance tools
- Token entry field – for entering an enterprise subscription token
Step 4: Sign In or Enter Your Subscription Token
If you are a personal user on up to five machines, click the “Sign in with Ubuntu One” button. This will open a web browser where you can log in or create a free account. After authenticating, the Security Center will automatically activate the free tier for your device.
For business or enterprise users, you will need a token provided by your subscription. Locate the token field (usually labeled “Enter token” or “Attach subscription”), paste or type your token, and click “Apply.” The system will validate the token and enable all associated Pro services.
Step 5: Enable Desired Services (Optional but Recommended)
Once your subscription is active, a list of available services becomes interactive. Toggle on the ones you need:
- Infrastructure – includes security updates and ESM (Extended Security Maintenance)
- Livepatch – applies critical kernel patches without rebooting
- Compliance – for CIS and DISA-STIG hardening
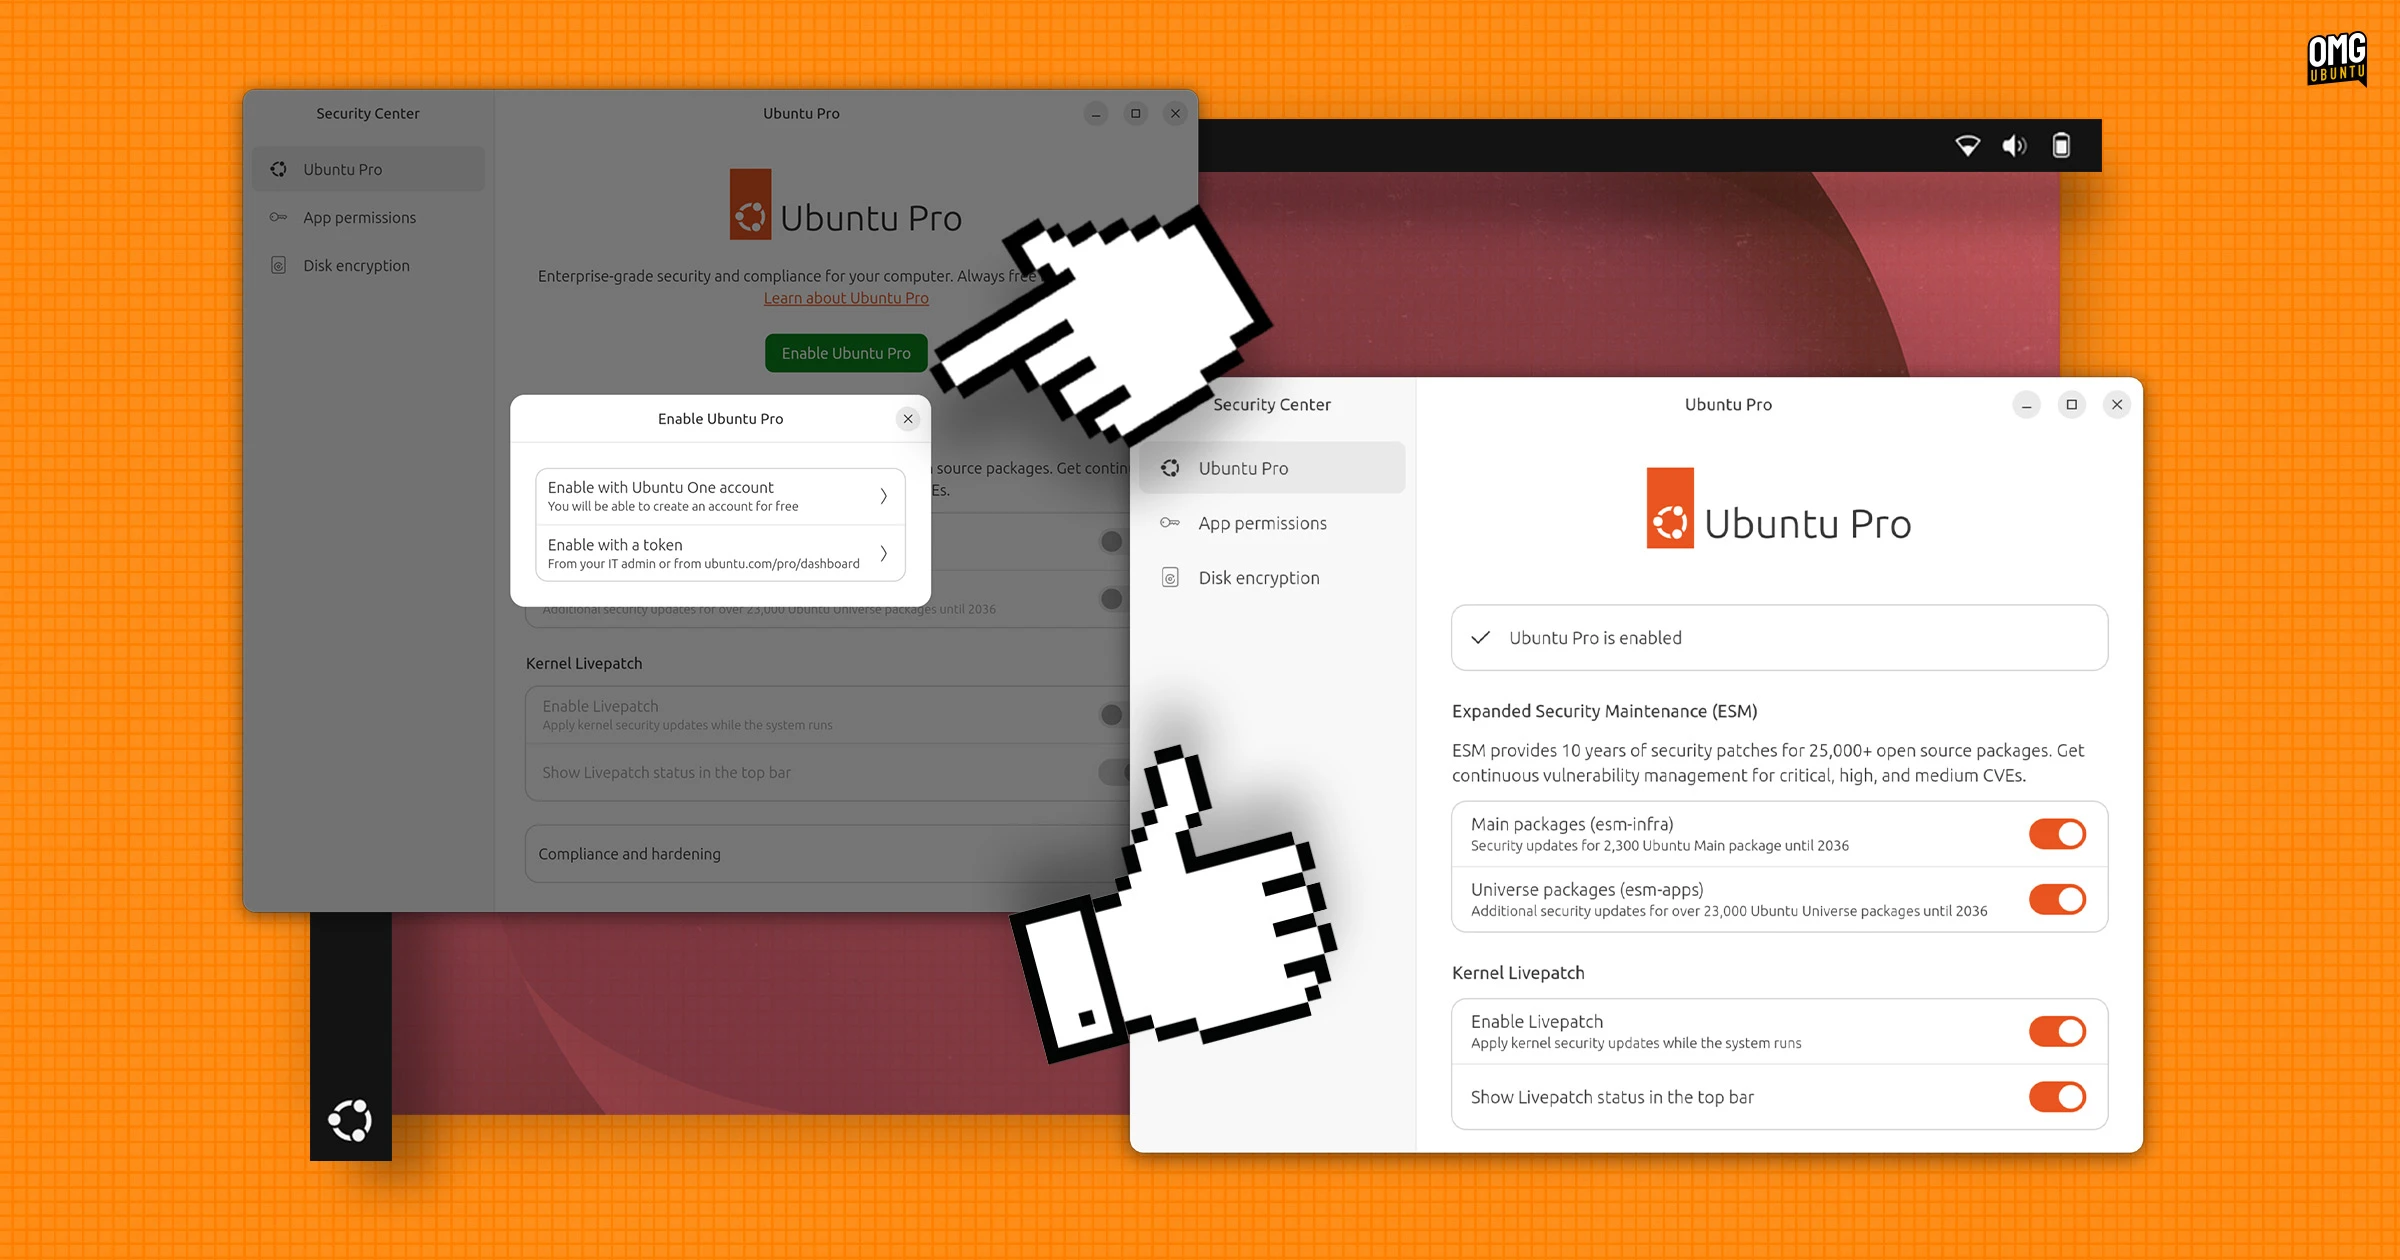
Step 6: Verify Activation and Explore Additional Settings
After enabling the services, return to the main Security Center dashboard. You should see a green checkmark or a “Protected” status next to Ubuntu Pro. Tap the “Pro” tab again to review your subscription details and expiration date. You can also manage multiple machines from here if you are using the same account on several devices. That's it—Ubuntu Pro is now fully active on your system.
Tips for a Smooth Experience
- Free vs. paid: Remember that the free personal plan covers up to five machines. If you have more than five, or if you are using Ubuntu in a commercial environment, a paid subscription is required. Check Ubuntu Pro pricing for details.
- Multiple devices: If you manage several Ubuntu systems, sign in with the same Ubuntu One account on each one. The Security Center will automatically sync your free entitlement across all of them.
- Check for updates: After activation, run
sudo apt updatein the terminal to ensure you receive the latest Pro-enabled security patches. Livepatch may take a few minutes to become active. - Troubleshooting: If you encounter an error while entering a token, double-check that the token is still valid and not already attached to another device. For personal accounts, ensure you are logged into the correct Ubuntu One profile.
- Staying informed: Canonical occasionally adds new services to Ubuntu Pro. Revisit the Security Center after major updates to review any new options.
Enabling Ubuntu Pro via the Security Center is indeed straightforward—more so than the old method. The redesigned interface makes it easy to understand what each toggle does, and the activation process is nearly instantaneous. With these steps, you'll have your system fully protected in just a few minutes.